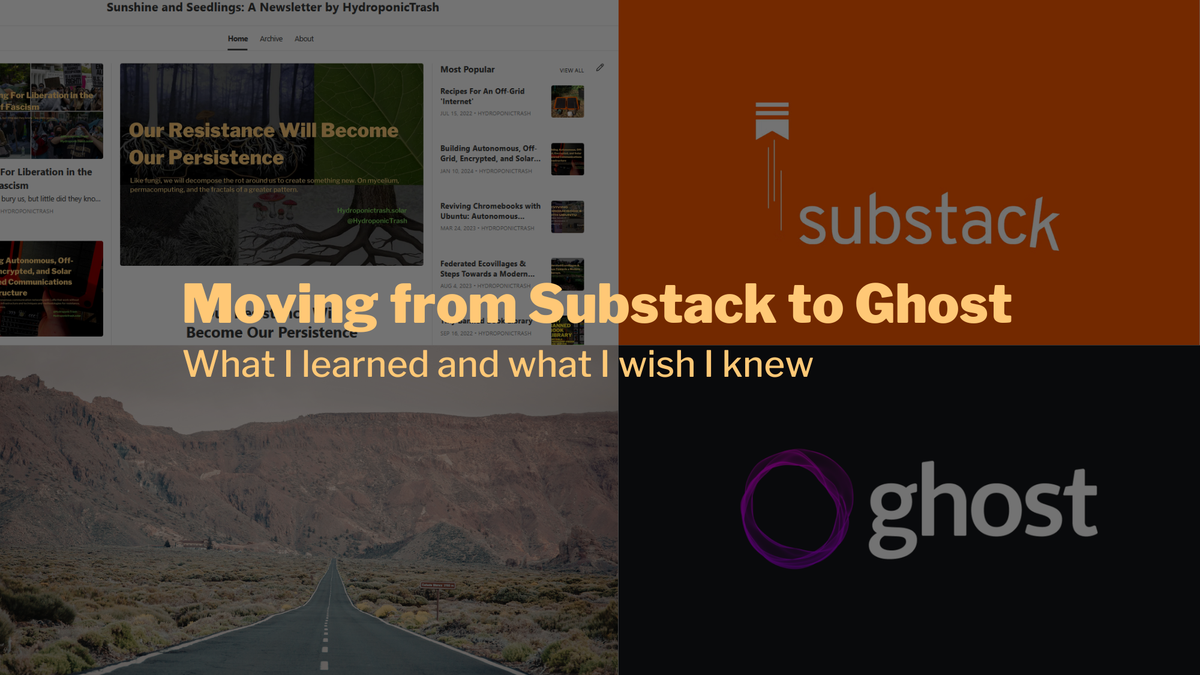
Moving from Substack to Ghost (And my battle with Mailgun)

Getting Ghost up and running was pretty easy, minus a couple problems that made me want to rip my hair out. This is mostly if you want to spin up Ghost on DigitalOcean using their 1-Click app in the DO marketplace, or if you're having problems yourself with this combo.
Not sharing this through the newsletter, but I wanted to document the things I found out to (hopefully) save someone else from suffering the same fate as I.
Having just set this up, hopefully I can save you from some issues.
Follow the docs, but you will hit some roadblocks along the way:
Version Issues
As of March 22, 2026, The Ghost 1-Click app in the DigitalOcean marketplace is using an old version of Ghost (v5.88.2) and not using the latest version available (6.22.0).
- Complete the initial setup steps with your domain and all that. Let it run.
- As soon as things are installed, update the Ghost CLI (su to root, though I think by default you should be)
sudo npm install ghost-cli@latest
- Then su as the ghost-mgr user (you need to be this user to run the ghost command).
- In order to download the latest 6.22.x updates, you need to first update the current Ghost version.
su ghost-mgr
cd /var/www/ghost/
ghost update v5
ghost update- In order to do that, you need the latest version of Node (22.13.1) to upgrade to version 6.22.x.
sudo su
apt-get update
apt-get upgrade -y
apt-get install -y ca-certificates curl gnupg
mkdir -p /etc/apt/keyrings

curl -fsSL https://deb.nodesource.com/gpgkey/nodesource-repo.gpg.key \
  | gpg --dearmor -o /etc/apt/keyrings/nodesource.gpg

NODE_MAJOR=22

echo "deb [signed-by=/etc/apt/keyrings/nodesource.gpg] https://deb.nodesource.com/node_$NODE_MAJOR.x nodistro main" \
  > /etc/apt/sources.list.d/nodesource.list

apt-get update
apt-get install -y nodejs - Then node should be the latest version run:
node -vand confirm that it's version 22. - Su back to ghost-mgr, go back to
/var/www/ghostand rerun the update.
su ghost-mgr
cd /var/www/ghost
ghost update- You should be on the latest version of Ghost. Now, go through the normal setup instructions and set up your admin account.
Configuring Mailgun/Fixing issues logging in as an admin when you don't get the MFA email.
In order to get emails to login to staff/admin accounts, you need to modify config.production.json with a Mailgun SMTP account. Follow those docs and make an SMTP account.
DigitalOcean Blocks SMTP by default at the Droplet level!!!
None of the docs I read said this, and I was getting pissed off that I couldn't log in as an admin from another machine or session.
The port for Mailgun's SMTP connection has to be 2525. No, it's not a normal SMTP port, but it technically is one, and the only one not blocked by DigitalOcean! Here is a sample config that you can carve out the Mailgun setting structure and add your account information.
{
  "url": "https://YOUR DOMAIN",
  "server": {
    "port": 2369,
    "host": "127.0.0.1"
  },
  "database": {
    "client": "mysql2",
    "connection": {
      "host": "127.0.0.1",
      "user": "YOUR USER"
      "password": "DB PASS"
      "port": 3306,
      "database": "idk bro it should say it"
    }
  },
  "mail": {
    "from": "email@yourmailgunemail.com",
    "transport": "SMTP",
    "options": {
      "service": "Mailgun",
      "host": "smtp.mailgun.org",
      "port": 2525,
      "secure": false,
      "auth": {
        "user": "email@yourmailgunemail.com",
        "pass": "yoursupersecretpassword"
      }
    }
  },
  "logging": {
    "transports": [
      "file",
      "stdout"
    ]
  },
  "process": "systemd",
  "paths": {
    "contentPath": "/var/www/ghost/content"
  },
  "security": {
    "staffDeviceVerification": true
  }
}ghost status, make sure it matches.Getting ActivityPub and the Network Section to work
I don't know what they fucked up with the update from v5 to v6, but ActivityPub won't work because there are settings in Nginx that aren't updated automatically.
This took forever to figure out, but you need to modify your Nginx config to pass the proper session tokens that registers your server with Ghost's ActivityPub servers (simplifying but who cares). In the Nginx sites enabled folder, you will see two files, one will have -ssl and the other will be your HTTP config. You can edit both.
sudo su
cd /etc/nginx/sites-enabled/
nano yoursite-ssl.conf
Your domain will be different, change it to what you have.
Add this to your configs. You can replace the OG location with this too, but these other blocks make sure that the traffic is proxied right in Nginx.
    location / {
        proxy_set_header X-Forwarded-For $proxy_add_x_forwarded_for;
        proxy_set_header X-Forwarded-Proto $scheme;
        proxy_set_header X-Real-IP $remote_addr;
        proxy_set_header Host $http_host;
        proxy_pass http://127.0.0.1:2369;

    }

    # ActivityPub endpoints
    location ~ /.ghost/activitypub/* {
        proxy_set_header X-Forwarded-For $proxy_add_x_forwarded_for;
        proxy_set_header Authorization $http_authorization;
        proxy_set_header X-Forwarded-Proto $scheme;
        proxy_set_header X-Real-IP $remote_addr;
        proxy_set_header Host $http_host;
        add_header X-Content-Type-Options $header_content_type_options;
        proxy_ssl_server_name on;
        proxy_pass https://ap.ghost.org;
    }

    # WebFinger and NodeInfo for Fediverse discovery
    location ~ /.well-known/(webfinger|nodeinfo) {
        proxy_set_header X-Forwarded-For $proxy_add_x_forwarded_for;
        proxy_set_header X-Forwarded-Proto $scheme;
        proxy_set_header X-Real-IP $remote_addr;
        proxy_set_header Host $http_host;
        add_header X-Content-Type-Options $header_content_type_options;
        proxy_ssl_server_name on;
        proxy_pass https://ap.ghost.org;
    }

    # Ghost-side JWKS for hosted ActivityPub
    location = /ghost/.well-known/jwks.json {
        proxy_set_header X-Forwarded-For  $proxy_add_x_forwarded_for;
        proxy_set_header X-Forwarded-Proto $scheme;
        proxy_set_header X-Real-IP        $remote_addr;
        proxy_set_header Host             $http_host;
        proxy_pass http://127.0.0.1:2369;
    }
Save it, then reload Nginx.
sudo nginx -t
sudo systemctl reload nginx
Su back to ghost-mgr, move back to /var/www/ghost and restart Ghost.
su ghost-mgr
cd /var/www/ghost
ghost restart
The network tab should work, and now you can get your ActivityPub handle!
Substack Importing from Windows
There is a bug in the Substack importer after you upload the zip of your previous posts and get to the part where you upload your free subscribers list. For some reason, on Windows, the content type for the upload is wrong, and it says that it can't upload the file because it isn't a CSV (Yes, it fucking is). I don't have the skills to say how to fix the core issue.
But the workaround was to use my Mac to do it (though you could do Linux, or do it in a VM or something).
Annoying, but that was the only way I could upload the CSV of my subscribers. After doing that and uploading the paid subscribers list, it was smooth sailing.
Mailgun sending restrictions (An update!)
I wrote this before I sent out my first newsletter post. After I did, all of a sudden, logins stopped working, and when I went to Mailgun, my account was banned.
I tried to talk to support but they didn't give me any reason. I thought it might have been my username or something, so I made a new account and moved over.
Turns out Mailgun has a limit on new accounts for sending emails.
To bypass this, contact support and complete the business verification process so they can lift the restriction. I wish I had known this before I sent my first Ghost newsletter post. I basically got insta-banned because my limited account was suddenly sending 5,800 emails all at once.
It was kind of annoying, but I got it going
Outside of not being able to log in as an admin from other browser windows, not getting emails, and the subscriptions process for all users being blocked, on top of all the weird import shit with Substack files, most of the setup was good.
Did this help?
If this info saved your mind while self hosting Ghost on DigitalOcean, feel free to leave a comment (you have to subscribe to the news letter for free - see what I did there) or if you want to drop a tip my way for the sacrifice of my sanity, hours of research, cursing, and burning my infra three times, that would be great.
Back to the Mailgun situation
3/23/26
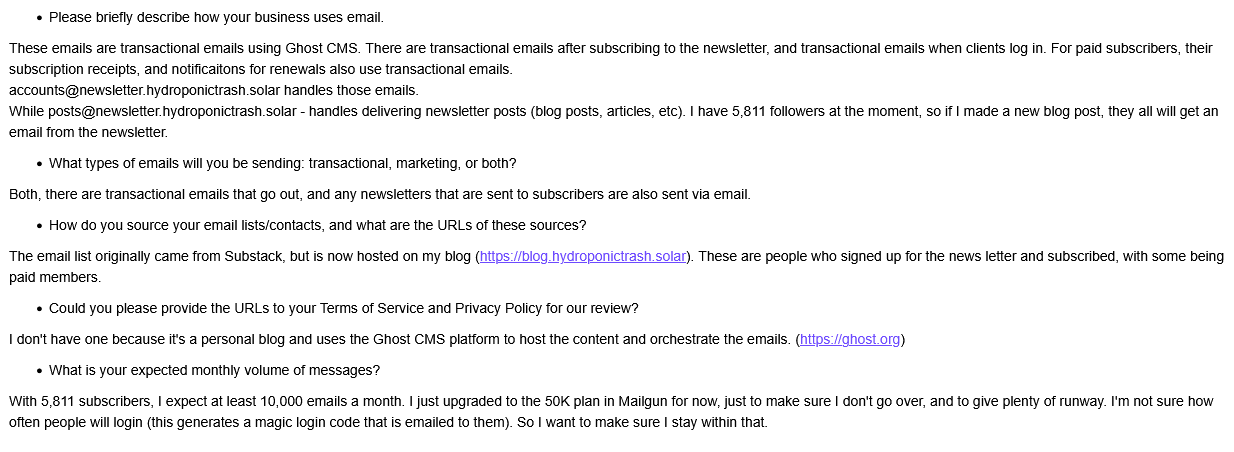
I thought this would be the end of this fiasco. Yeah, I got banned once on a different account, but I thought "Well, if I talk to support and let them know exactly what I'm going to be doing and tell them the exact metrics, I should be fine!" - WRONG.
Was it because I had Hydroponic Trash as my name? Maybe? Was it the blast of emails from my Mailgun account without going through their business verification process first? Most likely. I was also using a Gmail account to contact them, and I couldn't make a support ticket without a "professional email address". I ended up emailing their support team directly.
So I decided to follow their lead. I changed all of my MX records for my domain, moved my email to another provider, and got a custom email address for my domain. This took a long time because I was trying to maintain my MX records for sending and receiving while also being able to send with Mailgun, so I spent more time troubleshooting.
I made a new Mailgun account with my real name (just in case) and an email ending with my domain. Before any emails were sent, I created a service ticket to explain what I was going to use Mailgun for, to hopefully force them to do the company verification upfront - so they could ease up and not immediately ban me before I could even send an email out.
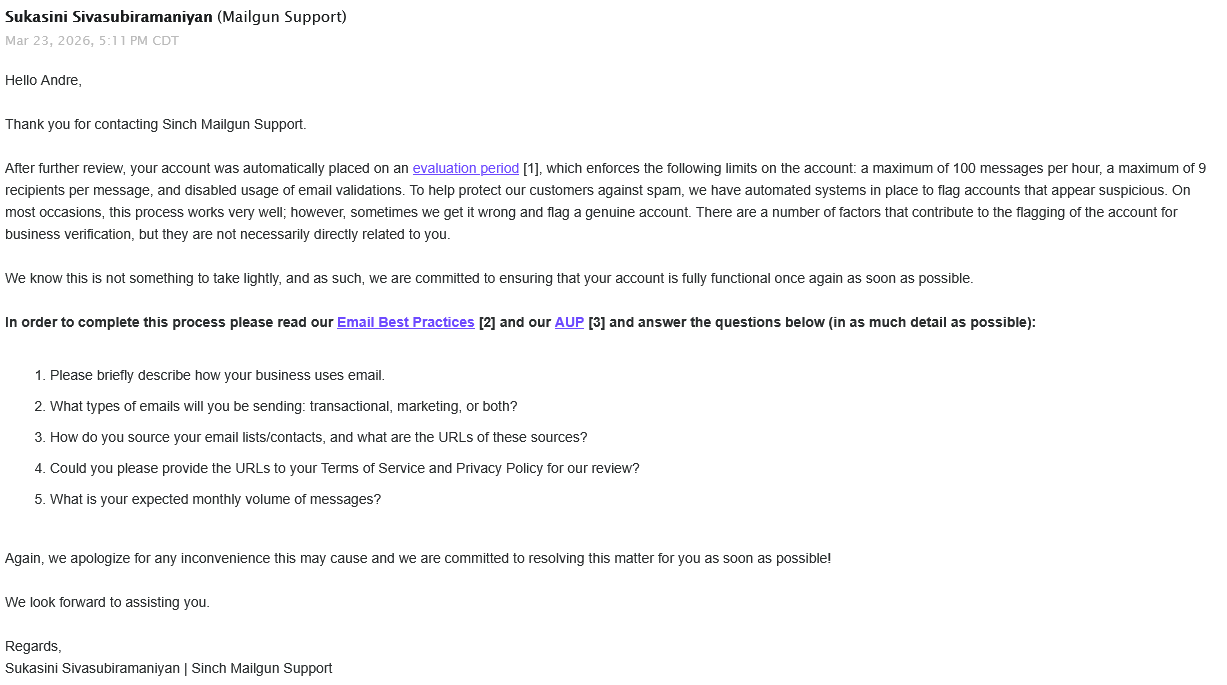
Ok, cool, so I explain and talk about all of the points.
An hour later, I get another reply.
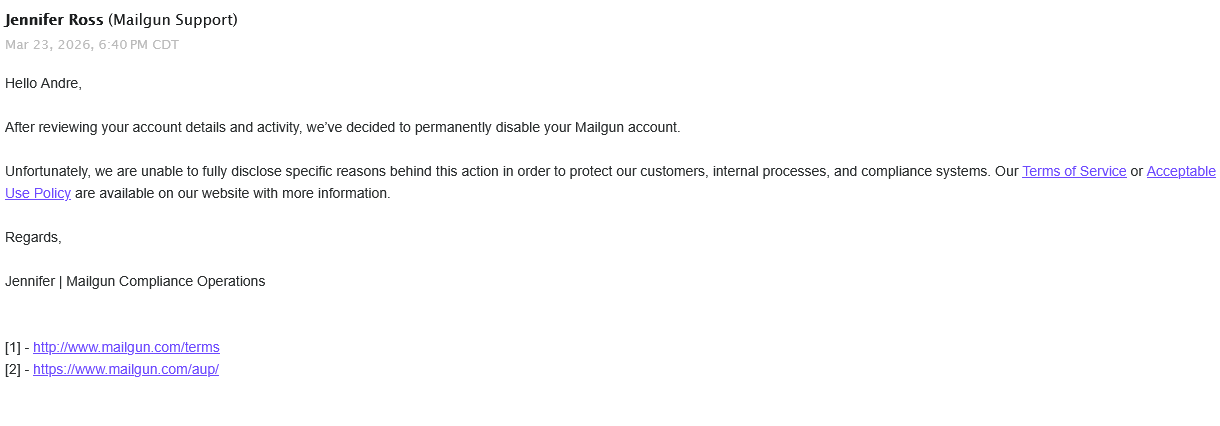
No explanation, no background, just banned, after I explained what I was going to be doing. At this point, I hadn't even sent a single email from this account.


And no response from there on out. I still didn't get a refund from my other account being banned, and at this point, I've dumped money into Mailgun for them to ban me twice. Even after I explained what I would be using the service for. Then they ghosted me after practically begging for my account to be unbanned.
Looking online at the Ghost forms, this is a pretty common occurrence. And multiple people said to tag Mailgun on Twitter to get a fast reply if they ghosted you via email. At this point, I was exasperated. I had been working on getting the blog sent for two days straight at this point. On top of my work schedule, I was frantically trying to get things working after telling everyone I moved over to Ghost. I was willing to beg, plead, cajole, and kneel to get at least a refund. But mostly I was just frustrated and pissed off at the whole situation.

Mailgun responded, created a ticket, and refunded my money in less than an hour after sending the tweet. But my account was still banned, so no traction there.
Using a proxy to forward emails to SES
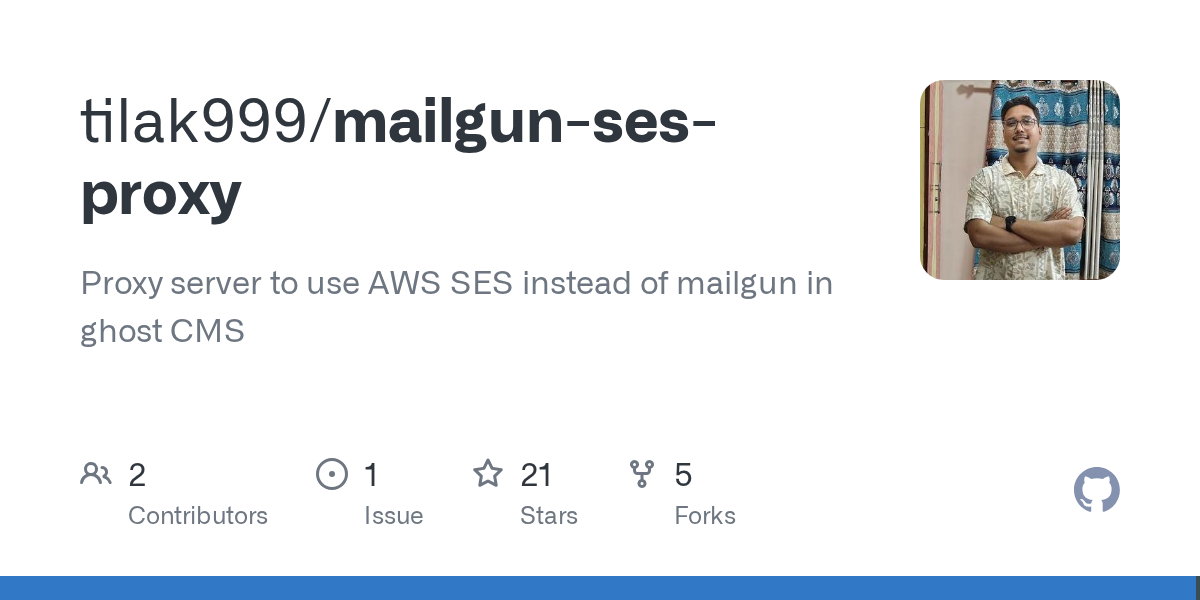
At this point, Mailgun shut me down entirely. Ghost is hardcoded to use Mailgun to send bulk emails, with no other option (officially) to send bulk newsletter emails with another provider. I went looking for options and came upon this git repo:

This creates a local proxy server to capture requests to Mailgun and instead sends the traffic to AWS SES.
One downside is that this project isn't well documented, and the steps are pretty broad on how to set this up. Having never touched AWS SES, it was daunting to figure out exactly what was going on, but eventually I got things working.
Setting up mailgun-ses-proxy
Make an AWS account and go through that whole process.
Once you get to the main dashboard, there will be a wizard to set things up. First thing is setting up and verifying your domain.
You can also go to the search bar and look for "SES" and go there.
Get your DNS records added to your provider. I used Cloudflare and made those changes there.
If you lose track or the wizard kicks you out, go back to SES and under Configuration look for Identities and your domain should be there. It kicked me out while setting DKIM because it verified all of my DNS records and counted it as complete before I could copy the DKIM records.
Create SES Configuration Sets
These are required to make the proxy work. In SES go to Configuration >>configuration sets >>Create Configuration
You need two of these, it makes it easier to name them exactly like this:
newsletter-configuration-setsystem-configuration-set
While making them, the only thing you really need to select is to add each configuration to your tenant.
Creating SMTP Users
In SES, go to SMTP settings and then Create SMTP credentials this will open AWS IAM.
I recommend not putting the full email of the account you want to create (it will be for your domain anyways). I wanted two email accounts:
- accounts@hydroponictrash.solar
- posts@hydroponictrash.solar
Accounts for the transactional emails, Posts for bulk emails.
Instead, when making the users it's best to set the username to what you are going to use it for so I named the first account transactionalemail first.
- Don't give it access to the management console
- Select
Add user to group, it will default to adding it toAWSSESSendingGroupDoNotRename- Click on Create group.
- Search for
AmazonSESFullAccessand add it. - Search for
AmazonSQSFullAccessand add it.
- Create the user
- Save the AWS username and password. The SMTP username should look like a long list of numbers and letters, that is what will be used to authenticate, not the account name.
- Repeat the process for your bulk email account, add it to the same groups.
Create SQS Queries
At the top search bar, type in SQS >> Click Create queue
You need three SQS Queues, name them exactly like this to make it easier:
newsletter-notification-queuenewsletter-queuesystem-notification-queue
While making them:
Type: Standard
Name: One of the three choices above
Encryption: Enable server-side encryption and leave the key type to Amazon SQS key
Access policy: Basic- When you get to choose the access policies you can choose
Only the queue ownerbecause we already set those accounts to have access to SQS when we made their SMTP usernames. - Leave the rest default.
- Create.
- Repeat for each of the three queues.
Actually installing the proxy
sudo mkdir -p /opt/mailgun-ses-proxy
sudo chown ghost-mgr:ghost-mgr /opt/mailgun-ses-proxy
su ghost-mgr
cd /opt/mailgun-ses-proxy
git clone https://github.com/tilak999/mailgun-ses-proxy.git .
npm install
Then you need to create a .env file for the proxy.
nano /opt/mailgun-ses-proxy/.env
Paste the contents of the env file from the git repo.
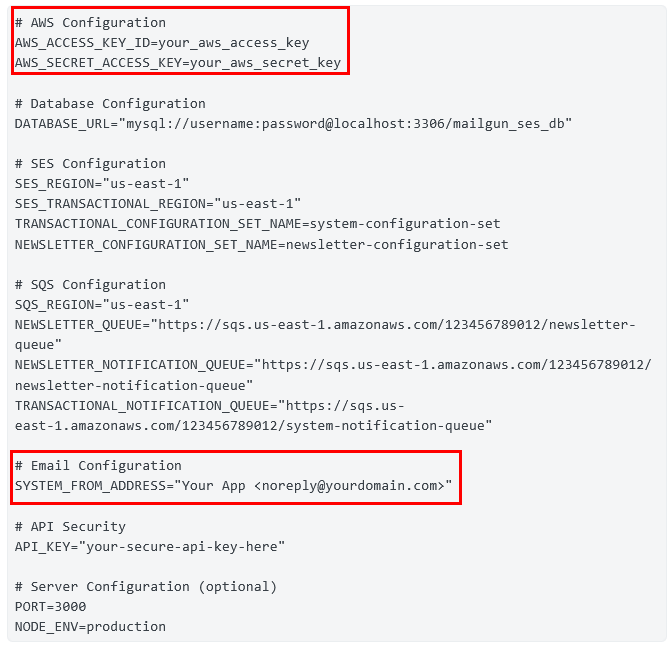
# AWS Configuration
AWS_ACCESS_KEY_ID=your_aws_access_key
AWS_SECRET_ACCESS_KEY=your_aws_secret_key

# Database Configuration
DATABASE_URL="mysql://username:password@localhost:3306/mailgun_ses_db"

# SES Configuration
SES_REGION="us-east-1"
SES_TRANSACTIONAL_REGION="us-east-1"
TRANSACTIONAL_CONFIGURATION_SET_NAME=system-configuration-set
NEWSLETTER_CONFIGURATION_SET_NAME=newsletter-configuration-set

# SQS Configuration
SQS_REGION="us-east-1"
NEWSLETTER_QUEUE="https://sqs.us-east-1.amazonaws.com/123456789012/newsletter-queue"
NEWSLETTER_NOTIFICATION_QUEUE="https://sqs.us-east-1.amazonaws.com/123456789012/newsletter-notification-queue"
TRANSACTIONAL_NOTIFICATION_QUEUE="https://sqs.us-east-1.amazonaws.com/123456789012/system-notification-queue"

# Email Configuration
SYSTEM_FROM_ADDRESS="Your App <noreply@yourdomain.com>"

# API Security
API_KEY="your-secure-api-key-here"

# Server Configuration (optional)
PORT=3000
NODE_ENV=production
AWS configuration and Email configuration in .env
The AWS configuration portion uses the credentials for the SMTP user you will use to send newsletter emails. In the email config portion, add the email address that you want your newsletter posts to send from.
Database configuration in .env
For the database configuration, if you used the DigitalOcean 1-Click image, the root password is in a configuration file.
sudo su
cat /root/.digitalocean_password
This took forever to figure out.
SES configuration in .env
For SES configuration, make sure you put in the right region! You might have been put in us-east-1, but for me, I was in a different region when I made my account.
SQS configuration in .env
You can find your URLs in SQS, in Queues, click on the one you need, the URL should be there. Repeat the process.
API Security in .env
This will be the API key you will use to communicate with the proxy.
Installing the proxy continued
sudo nano /etc/systemd/system/mailgun-ses-proxy.service
Paste this in
[Unit]
Description=Mailgun SES Proxy
After=network.target

[Service]
Type=simple
User=ghost-mgr
Group=ghost-mgr
WorkingDirectory=/opt/mailgun-ses-proxy
EnvironmentFile=/opt/mailgun-ses-proxy/.env
ExecStart=/usr/bin/node /opt/mailgun-ses-proxy/dist/server.js
Restart=always
RestartSec=10

[Install]
WantedBy=multi-user.target
There is an issue if you run npm run start without telling the service that it should use /usr/bin/node. By default, the repo tries to use bun, and it will error out. Opt to use Node to run it.
sudo systemctl daemon-reload
sudo systemctl enable mailgun-ses-proxy
sudo systemctl start mailgun-ses-proxy
This will make it so the SES proxy will run constantly.
You can check for errors with sudo systemctl status mailgun-ses-proxy or sudo journalctl -u mailgun-ses-proxy -f
You should see something like:
> Server listening at http://localhost:3000 as production
[processNewsletterQueue] Processing newsletter queue
[background] Processing newsletter events queue
[background] Processing system events queue
If you see SignatureDoesNotMatch: Your AWS_ACCESS_KEY_ID / AWS_SECRET_ACCESS_KEY are wrong.
Setting ENV paths directly in the ghost service
The repo just says Configure Ghost to use the proxy by setting these environment variables in your Ghost installation: with no explanation on how to actually do that.
What worked for me is finding the name of the Ghost service and adding it directly in there.
sudo systemctl list-units | grep ghost
That will show you the full name of the Ghost service. It will be based on your domain and set up but it should follow the convention:
ghost_blog-<first_part_of_your_domain>-<TLD>.service
Take that and run this:
sudo systemctl edit ghost_blog-<remainder_of_your_service_name
Edit the file and add this block.
[Service]
Environment="bulkEmail__mailgun__baseUrl=http://localhost:3000/v3"
Environment="bulkEmail__mailgun__apiKey=APIKEYINSIDETHEENVFILE"
Environment="bulkEmail__mailgun__domain=YOURDOMAIN"- Your API key is the same key you used to set up the proxy .env file (set up earlier)
- Replace the domain with the domain you are using for your Ghost blog, do the full thing like
example.com.
Save and then run:
sudo systemctl daemon-reload
su ghost-mgr
cd /var/www/ghost
ghost restart
Set up transactional emails
Edit /var/www/ghost/config.production.json
To get the host, go to SES >> SMTP settings >> it should show the SMTP endpoint to use.
{
  "url": "https://YOUR DOMAIN",
  "server": {
    "port": 2369,
    "host": "127.0.0.1"
  },
  "database": {
    "client": "mysql2",
    "connection": {
      "host": "127.0.0.1",
      "user": "YOUR USER"
      "password": "DB PASS"
      "port": 3306,
      "database": "idk bro it should say it"
    }
  },
  "mail": {
    "from": "Display Name <accounts@YOURDOMAIN.com>",
    "transport": "SMTP",
    "options": {
      "host": "email-smtp.us-east-1.amazonaws.com",
      "port": 2587,
      "secure": false,
      "auth": {
        "user": "ses_smtp_username",
        "pass": "ses_smtp_password"
      }
    }
  },
  "logging": {
    "transports": [
      "file",
      "stdout"
    ]
  },
  "process": "systemd",
  "paths": {
    "contentPath": "/var/www/ghost/content"
  },
  "security": {
    "staffDeviceVerification": true
  }
}- Port 2587 works with SES and bypasses the need to ask DigitalOcean to unblock SMTP. (They won't by the way)
- The user and pass here are the AWS user and pass not the email, but the AWS ID for the accounts (should start with
Aand have a bunch of letters and numbers). You can use the SMTP account credentials for the account you want to send transactional emails with.
Save and restart Ghost:
ghost restart
https://docs.aws.amazon.com/ses/latest/dg/request-production-access.html
Sending test emails
Again, if you didn't already request access to production, then your emails will only go to emails that you verify.
Testing transactional emails
You can test transactional emails in a couple of ways:
- Go to the Ghost admin panel in a private window or different IP and try to login.
- Subscribe to your newsletter using the same email address you used to sign up for AWS.
If you get an MFA code, it worked.
Testing bulk emails
You really can't test sending it out to unverified accounts while in the sandbox. But you can create a user tag and add the email you used to sign up with AWS, or verify a different email address (you get a link and basically accept that you own it).
In the Ghost admin panel go to Members >> Add your email or find your email >> Under Labels add something like SELF-TEST or something so you can tell it's your testing group and save.
Then make a test post >> press publish >> uncheck free and paid >> Choose Specific People >> select your newly created test group >> send it off.
You should get an email with your test newsletter post. Delete the post if you have people already following you or do it late at night and forget to delete it like I did.
Now just wait until AWS says you have production access.
The proxy will batch send emails to stay under the SES rules and take care of that for you.
Did this help?
If this info saved you, drop a comment, it will mean a ton (you have to subscribe to the news letter for free - see what I did there). Or if you want to drop a tip my way for the sacrifice of my sanity, battling with Mailgun, switching my infra like 5 times, and trying to figure out setting up this SES proxy that would also be amazing and help pay for my subscription fees trying to get this working.
A message to Tilak999
Thanks for your work on this proxy. It really saved me (hopefully AWS gives me production access and doesn't ban me)
If you want help documenting the project or see steps that should be changed, drop a comment!